How to Defrag Registry Files

At the beginning of the first times you run Windows, the registry does have a compact structure. But as you move along with all your computer activities, especially if you install/uninstall programs very often, the registry size grows and its structure can become very cluttered. For example, uninstalling a program may result in an empty space that was previously allocated to the program. Eventually, your Windows speed can become so decreased.

What are the signs that your registry needs to be defragged? Your computer runs much slower than usual and that you add/remove programs a lot. To be sure about this you can try to use Auslogics Registry Defrag. It lets you to do the registry fragmentation analysis so you will know whether the defragmentation is neccessary or not. Then you can move on to defrag if needed.


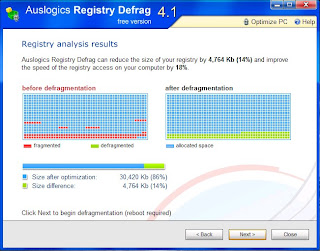
Running this program only involves a few clicks. It automatically analyzes your registry structure for fragmentation once you run it. Then an analysis report is displayed allowing you to know the comparation of condition at before vs after defragmentation, the optimized size that is possibly achieved, and how much the improvement of your computer speed in accessing the registry will be.

As you can see from the screenshot, the analysis report is presented nicely both in numerical and graphical manners. You can then start the defragmentation which will make the program restarting your system to complete the process. After it all finishes, a detailed report in HTML will be given for more information.

OS supported: Windows XP/Vista/2000/2003

Windows Software Buzz, Monday, December 31, 2007 At 2:16 PM - Permalink | Post a Comment


Make a Flash Photo Gallery In A Few Minutes with Web Album Maker

Creating a professional Flash or HTML photo gallery isn't as hard as you think if you use this free program. The whole making process can be completed with a few clicks, with simple but nice user interface so that easy to understand and operate, and several sweet gallery templates are available. All for free.


With Web Album Maker, there are only three steps to make a complete gallery: adding images, select a template, and create the gallery. Since the interface's look uses a sort of wizard style, you are likely to have no difficulty at all in operating this program.

You can add watermark, text or image, to all photos with one click. The position and transparency of the watermark can be adjusted. Moreover, you also have freedom to set the JPEG quality of the photos produced for the gallery.

OS supported: SP2 for Windows XP, Windows 2000, 2003, Vista

Windows Software Buzz, At 1:54 PM - Permalink | Post a Comment


How to Merge Photos and Images Without Photoshop

Photoshop does allow you to merge images, but there's another solution that is easier to learn and use. Its name has already spoken for itself that it is designed specifically for images merging, and that is Image Merger.EXE. This program is especially perfect for those who aren't familiar with Photoshop.


I prefer to run the wizard than the Advanced Merge window to use it. By using the wizard you will be guided step-by-step until you complete all the processes, and also you have option to do batch merge where you can merge an image source to other several images with different or same style of merging.

It's very easy to use this app so I don't describe how to use it to merge images in detail here. What is left to say is probably about its features. Not many indeed, but they are probably enough to satisfy some general merging's needs.

Here you are the features:
  • Merge effects: normal, if darker, if lighter, additive, subtractive, superimpose and all its variation, transparency.
  • Ability to add or reduce superimpose intensity for the upper and lower range of the image.
  • Support many popular image formats such as JPEG, BMP, PNG, Tiff, PNG, etc.
  • Merge multiple photos
  • Image can be resized freely

Windows Software Buzz, At 1:48 PM - Permalink | Post a Comment


How to Delete Windows XP Startup Items Forever

One way to disable a program from running automatically on WIndows startup is by removing the check mark of the program within the startup panel of System Configuration Utility.

This disabled item, however, remains inside the panel. Windows doesn't give you any way to delete it. Luckily, there's a tiny software that can do the job easily. It's called MSConfig Cleanup.


How to Use

1. Select the programs you want to delete by clicking the tiny boxes.
2. Press the button "Clean Up Selected" to do the removal.

Windows Software Buzz, At 1:44 PM - Permalink | Post a Comment


How to Defrag Specific Files and Folders, Not An Entire Disk

I've talked about how to defrag a drive and how to defrag multiple drives at once. Now what if you want just a folder or even a file to defrag? This post covers two free third-party applications that can do this specific job. Both are easy to use, but each has its unique feature (and of course weakness).

WinContig

What makes it stand out from the rest similar programs is that it allows you to completely free to choose which files or/and folders you want to defrag, and that you can make profiles for any defragment task you've executed.


Its capability to create profiles is very helpful when you have one or more folder(s) containing files you modify regularly. Do the defragmentation, and save it as a profile. After that, whenever you want to defrag all the folders you just have to activate the saved profile.

What you can get from and do with WinContig:
  • Ability to analyze the fragmentation levels for all selected folders and files
  • Add files or folders as many as you want
  • Detailed report for analysis and defragmentation
  • Small size - around 300KB for the reviewed current version
  • Portability - no installation is needed
  • Optionally checking volumes for any errors before starting to defrag
  • Provides some optional command-line switches
OS supported: Windows 2000/XP/Vista
License: Free for personal and commercial use
Version reviewed: 0.77


Defraggler

What makes it interesting though it's still in beta, honestly, is that it comes from the developer of the popular free file cleaner, CCleaner. This programs is created specifically for defragmenting only selected files.


Things from Defraggler you may not want to miss out:
  • How to use - First you analyze a selected drive, and it will list all the fragmented files within. Then you can freely select which of the files you think need to defrag
  • Portability - Yes, you need to install it first, but then you can just copy the exe file from your Program Files folder to a USB drive
  • The unique feature - when you click a file name on the fragmented file list, Defraggler shows you how much it occupies your disk space, how fragmented it is, and the location of each of its fragmented blocks on the disk. You can see all the information in a quick glance as they are shown in a graphical manner.
It's still in beta version, so there will be some frequently improvements on it.

OS supported: Windows 2000/2003/XP/Vista
License: Free for personal and corporate use
Version reviewed: 1.01.044 BETA

Windows Software Buzz, Saturday, December 29, 2007 At 9:55 AM - Permalink | Post a Comment


How to Do Disk Defragmentation on Windows XP Using Its Built-In Defragmenter

The more often you work with your files, particularly if you frequently make some changes to the files (such as deleting the old and create the new ones, copy/move/paste files or folders) the files structure within your disk can become very fragmented. Heavy fragmentation can significantly reduce Windows system performance. So it is important to do defragmentation regularly.

Windows has a built-in tool to defrag your disk that is called as Disk Defragmenter. Here is the practical guide of how to use it:


1. Run Disk Defragmenter - Click the Start button, then go to these locations respectively: All Programs > Accessories > System Tools > finally select the Disk Defragmenter option and click to run it.


2. Analyze the fragmentation - Before starting the defragmentation, you should analyze the disk first to find out whether or not it needs to defrag. Right-click on any drive, then select the Analyze option. Later on, start the defrag if the analysis result, which is a pop-up message, advices you to do so, or leave it if the result says otherwise.


3. Begin the defragmentation - Let's assume that one of your drives needs it. To trigger the process, right-click the drive and select Defragment option.

4. Report - After the defragmentation is finished, optionally you can view its report.


Notes: to run it effectively, the drive should have at least 15% free space. If it is less than that, You will get a warning of insufficient disk space if you force it to defrag. You should increase the disk space by deleting unnecessary files or compressing some files contained within.

Windows Software Buzz, At 9:33 AM - Permalink | Post a Comment


How to Defrag Multiple Drives At Once

It would be nice if Windows built-in defragmentation tool can defrag several drives at a time, but unfortunately it doesn't allow you to do so. Speedefrag, on the other hand, makes you possible to defrag all the drives at once.


Here is what you can do with the program:
  • You can choose whichever drives you want to defrag.
  • It also has options to restart or shut down Windows after the defragmentation process is finished.
  • The schedule menu lets you to run the defrag automatically after a specified time or after X hours
  • It can be minimized to tray
The serious lack from this program is that to be able to use its schedule capability you have to run it all the time. It means your PC must run 24/7 (24 hours every day). If you turn off your computer or close the program, the schedule that you have set will be automatically disabled.

I myself only use it if I found that several drives of mine are very fragmented, and if I'm just too lazy to defrag them one by one. By the way, you still have to use Windows built-in defragmenter to do the fragmentation analysis.

OS supported: Windows Vista/XP
License: Freeware
Version reviewed: 5.2

Windows Software Buzz, At 9:19 AM - Permalink | Post a Comment


How to Move Firefox Tabs to the Left and Right Side of Screen

We've talked about how to move Firefox tabs from top to bottom, which in turn becomes my favorite tab position, especially after I discovered an extension that can add numbers to tabs (1 up to 8). Now, thanks to Jonathan who has let me know that there's an extension to move the tabs to the left side of the Firefox screen. It's called Vertigo.

Look at the screenshot below to see how your Firefox tab bar will look like.


Things to consider before you decide whether to install it or not:
  • Though the tab bar can be resized, you still have less screen width than the usual
  • You need to adjust the tab width to display all the close buttons of each tab. I set mine to 150. Less than that will make only the close button of active tab that is kept displayed.
  • If you install Tab Mix Plus extension, you will have to make some adjustments to run Vertigo's options properly as most of the options are overridden by some of Tab Mix Plus's settings.
  • Vertigo helps a lot when you often open many tabs as the vertically-positioned tab bar can display much more tabs than the horizontally one.
  • It works perfectly with Fancy Numbered Tabs extension as well.

Extra Tips:

Vertigo alone can only move the bar to the left. To be able to move it to the right, you need to install Tab Mix Plus, too. Here is how you can move the bar with Tab Mix Plus installed:

1. Open Tab Mix Plus Options located in Tools menu.
2. Go to Display section.
3. Select the Tab Bar tab.
4. Find the "Position" option and do the following:
      
  • set the bar position on top if you want it positioned to the left
  •   
  • or set to bottom to display it on the right
Vertigo

Windows Software Buzz, Tuesday, December 25, 2007 At 12:51 PM - Permalink | Post a Comment


How to Find A File Fast Among Hundreds of Files in A Folder

What do you usually do when you need to access a file located in a folder that is flooded by hundreds of files? Use your mouse to scroll down the list, or the [Page Down] key, or by means of the scrollbar? While you can use any of them, none is efficient in this case. Not like the tricks I'm about to cover here.

A note before the trick
The trick is actually very simple, yet I notice that so many people don't know it yet and still using the traditional scrolling way. If you're still using that common way, I'm pretty sure that this trick will make you able to find a file in a folder much faster.


How to do it
The key is the first letters.

Suppose that you need to find a file name DELTA. Click the blank area of the folder to bring in the pane focus, then type the first letter, which is D. You will jump instantly to the first file whose D is the first letter. From this point you can use your mouse scroll a bit to locate the target file, or just keep hitting D to jump from file to file.

If the list of files with D as the first letter is long enough, you can type more letters instead of just one. Type DE, or DEL, or even DELTA if possible. You must type the letters quickly to be able for the trick to work.

Where does the trick work?
Basically almost all dialog or panel that contains a list of files allows you to do this trick such as in Windows explorer, Open/Save As dialog, Group Policy Editor, and Registry.

Extra Tips
In Windows explorer this extra tip will speed up your file searching:
- right-click on the blank area of the folder.
- select the option [Arrange Icons By], followed by clicking [Shown in Groups].
- click the column [Name]

Now your files are automatically sorted by the first letter of their names

Windows Software Buzz, Thursday, December 20, 2007 At 12:50 PM - Permalink | Post a Comment


Portable Free Anti Keylogger to Protect Your Password

Keylogger is a serious threat for your privacy safety. It records anything you type and save it in a log which will be transferred to the person who installed the keylogger on your computer. Your password, user name, what you type in forms... anything you type won't be a secret anymore.

Safekeys is a free program that comes to the rescue. It is a virtual keyboard where you type text using mouse instead of the keyboard. Since you don't use the keyboard, keylogger can't steal what you type. This program is particularly useful when you use a public computer.


How to Use
What you type with this program is displayed within its text box in form of asterisks. Select, drag and drop it onto, for example, the password box of your online bank login form.

Safekeys is a standalone program, so you can have it with you wherever you go.

Windows Software Buzz, At 12:42 PM - Permalink | Post a Comment


Check Disk Space Usage in Windows with Visdir

While there is a vast array of junk file cleaners out there, the time will eventually come that you need more. Junk files aren't enough, you want more to delete. Then you find a problem. Which files are actually taking up your disk space?

Unless you're having much spare time to spend on browsing the folders and files one by one, I suggest you to use Visdir. It is a free program that can analyze your files and present the scanning result in convenient displays.


Why should download Visdir?
  • The scanning is quite fast - More than 4000 folders, which of course contain more files, need less than 2 minutes for the complete scan.
  • Nice result representation - The scanning report is graphically presented in form of pie, horizontal, or vertical bar. In the pie chart, each file or folder has different color. When you put your mouse cursor on any of the colors, or the bars, some information such as the size of file and folder is displayed at the bottom part of the program's window.
  • Full or partial scan - You can choose to scan all drives including removable disk or just a single drive.
  • Small files grouping - If a folder contains too many files, the chart may get cluttered. When this is the case, combine the smaller-size files into one container called 'other'. This can be configured in its preferences window.
  • Direct access to folder. You can go directly to the selected folder in Windows explorer from within this program.
Though it is an old program and long there is no update, I found this still a handy help to check what files exactly are consuming much of my disk space; besides, I haven't found a better one yet up to now.

Visdir is compatible with Windows version 95, 98, ME, NT, 2000, and XP.

Windows Software Buzz, At 12:23 PM - Permalink | Post a Comment


Recover Lost or Deleted Partition and Mount It for Free with Partition Find and Mount

Does one of your partition suddenly disappear? Or is it accidentally deleted when you're playing around with some software? This Windows freeware makes anyone possible to restore any lost partition as long as its file system doesn't have severe damage and the related hard drive has no physical damage. It supports all versions of FAT and NTFS.


It is safe for your data and easy to use, involving only a few clicks to make all done. In some easy cases, this software can find a lost partition fast. Like a partition whose problem only corrupted MBR (Master Boot Record), the developer claims that it can be brought back to you in a second.

I haven't any chance to try it out yet since I have no a lost partition. Nonetheless, I decided to announce this Partition Find and Mount here because I see it as an easy, straight-forward way for an average Joe who doesn't so familiar with his computer stuff to restore the lost partition so he can have back his, if any, important data.

How it works?
  • It will automatically list all drives found in the first running.
  • To start the recovery, right click on the the drive where the partition is contained, and select [Scan] command. All the partitions, including the lost one, will be displayed together later on.
  • After the partition is found, you can mount it by right-click it and select [Mount as...]. A message dialog will pop up asking you to assign a drive letter to the partition, accompanied by an option to see it in the Windows explorer.
In steps 2, after you click the [Scan] command, you will be asked to choose one from three scanning methods, which are:
  • Fast Intellectual Scan - the fastest scanning.
  • Normal Scan - scan all disk area but partitions created by non-standard partitioning software may not be found.
  • Thorough Scan - if you aren't successful with the normal scan
This tool also allows you to create and save an image from every partition or the entire disk.

Note: it is free for personal use.

Windows Software Buzz, Tuesday, December 18, 2007 At 9:49 AM - Permalink | Post a Comment


Make Calendar from Your Personal Pictures for Free with Tkexe

Tkexe is a Windows freeware that enables you to create a unique calendar of your own. You can make monthly, yearly, weekly, and birthday calendar. Since everything can be customized, you can have a calendar style exactly like what you want.

Besides ability to add your own pictures, Tkexe offers many other features which all can be used for free without limitation.

Check out what you can do with this software below.
  • choose and insert one or more images of your own
  • add border and transparent effects to images
  • mark certain days as free days, work days, or special days
  • font size, color, style can be personalized
  • the day names can be changed into anything you want, like change them into your own language
  • the position and size of all elements can be arranged simply by drag and drop operation
  • double-click on any element brings you to its customization window
  • ability to use your own notation to replace the standard number for the dates
  • insert specific information for a date and optionally display it below the date
  • ability to customize every single date by double-clicking a date
  • 12 months aren't enough? Then you can make 24 or 36 months calendar
There are still more you can get from Tkexe.

Though it doesn't offer many templates, you can create your own as many as you want. Just pick a template, make neccessary changes, and save it as a new one.

Windows Software Buzz, At 9:39 AM - Permalink | Post a Comment


Minimize, Maximize, Close, and Restore All Windows in Two Clicks with Iconize

Two days ago I posted about how to close all windows at once. This current post basically has the same idea, but uses different approach which is better, faster, and can be used for some other similar tasks.

Still remember the past tip? You've got to click every taskbar button to be able to close all at one time. Not so hard, isn't it? But I guess most of us are just too lazy that we always search for a quicker way to do everything, right? Or maybe you just want a more practical way in anything so you can do much much more in one day.

So, here is the simple solution: use Iconize.

Iconize works from the system tray. Double-click it, and all windows are minimized. Right-click it, and it will pop-up several options: minimize, maximize, restore, or close all windows, accompanied with a list of every window's title. If you click a window's title within the list, the related window will be iconized (minimized) to tray, which can be restored simply by double-clicking the icon.

Since Windows XP provides us a built-in shortcut to show the desktop, which is Win key + D, I use Iconize mostly for closing all running windows, and sometimes iconize several windows to reduce the taskbar clutter when I open too many of them.

Note that the iconized window will be disappeared at Alt + tab dialog as well. It means the clutter is also gone from the Alt + tab, helping you to be more focused on your current task if you use the dialog to jump from window to window.

Iconize supports Windows 98 and newer versions, and it is free to download and use.

Windows Software Buzz, At 9:26 AM - Permalink | Post a Comment


How to Find Windows Error Codes Meanings Fast

When your Windows system somehow gets trouble and display an error code, you may write it down on a paper or copy it and then go to the Microsoft official site to lookup for the meaning. Some of you may like this way, but some others may prefer to have another way. Imagine you have the meaning for each error code right on your desktop, wouldn't it be nice?

Now, how to do it?

Just use the Gregory Braun's freeware called Error Messages for Windows.

Error Messages for Windows is a small utility that will help you to find the descriptive meaning of Windows error codes without having to crawl over the Microsot site. When you get an error code, you just run it and type the code within the specified column (see screenshot below). The result will be displayed without delay at all. No need to press Enter or any button.


At the Error Code List tab, you can find a complete list of error codes together with the meanings. It enables you to print the list as well. Press the Print button and it will produce the list in a HTML file for you to be printed.


It supports Windows 95/98, ME, XP, Vista, 2000 or Windows NT.

---------------------------------------- Summary:
This software enables you to:
1. lookup each error code meaning quickly
2. read and print the list of error codes

---------------------------------------------- Note:
  • Not all error codes displayed on your screen are available in this utility because some are generated by individual applications that doesn't map to a spesific Windows error code. Visit the application's developer site to find spesific information about the codes when this situation happens.
  • Error message like QA 87F35E49 isn't an error code, it is just a message pointing you out the memory location in which the error takes place.
Windows Software Buzz, Sunday, December 16, 2007 At 12:21 PM - Permalink | Post a Comment


Add Preview Mode to Firefox Tab Contents with Tab Scope

You open many tabs at one time... so many that almost each tab's width doesn't fit the page title. Then you don't remember or you just have no idea anymore which is which. You click a tab you think the correct one, but not. You click another tab again and again until the page is finally found.

Does the above situation example sound a little bit extreme?

May be. Still, even if you don't do the "accidental" clicks that many, some of your time is spent uselessly clicking the wrong tabs, not the mention the likeliness of unexpectedly pressing the close buttons.

It is what is called as Tab Scope that can probably help you to deal with the situation. With this extension, you will have the ability to preview a tab's content in a pop-up screen by hovering your mouse over the tab.


Its option allows you to:
  • configure the preview's delay time
  • resize the preview screen
  • display the preview beneath or on top of tab bar
  • show pop-up for contigous tabs with no delay
  • not to show the pop-up for current tab
Windows Software Buzz, At 12:15 PM - Permalink | Post a Comment


Repair Disappeared Taskbar & Windows Explorer in Windows XP

When Windows explorer crashes, it automatically stops its own process. When the process is stopped, Windows explorer and taskbar are gone together as if they're lost somewhere. Usually both will show up again in a few seconds later after the explorer restarts itself. Unluckily, sometimes it just won't do it.

It is actually easy to solve this problem, but for you who don't know it yet you are likely to see no option other than press the restart button on your computer.

Here is the simple fix to show up your closed Windows explorer and taskbar again.

- press Ctrl + Alt + Delete keys at once to display the Windows Task Manager


- click the 'File' menu and choose 'New Task (Run...)' command
- at 'Create New Task' window, type explorer.exe within the available column


- press Ok

Soon after you finishes all the steps above the Windows explorer and taskbar will be back in action.

Note that if this trick doesn't work it means your Windows system is having a serious error, which makes rebooting is the only way out.

Windows Software Buzz, At 11:53 AM - Permalink | Post a Comment


How to Move Windows Taskbar Buttons for A Better Multiple Tasking

The benefit of moving and arranging application's button on taskbar is obvious if you're used to work with several windows at the same time. Sometimes or too often you accidentally click a button and open a window you don't intend to. You minimize it but a few minutes later another accidental click takes place. Or may be you find that the two windows you're working with the most are located far away each other.

Ability to move taskbar buttons helps you a bit in productivity, or at least it can reduce or even eliminate the accumulated time you spend on the accidental clicking and the possibly disturbed feeling resulted. It increases your work's speed a bit as you can move any taskbar buttons you want, enable you to jump from button to button in a kind of logical line.

No matter what your purpose is, there are 2 sweet freeware for you to be able to move taskbar buttons.


Taskix
Taskix is definitely the choice for you if you simply just want to move taskbar button. It has no additional feature other than allowing you to auto run it together with the Windows startup. It doesn't even reside in the system tray, but you know it is running when you check it through the Windows task manager.

A small message window Immediately appears after you double-click the program's icon telling you its status (whether it is being active or not) and asking you to activate it when inactive. Click the 'activate' button and it will run invisibly in the background. Then you can move taskbar buttons by drag and drop action.

Taskix consumes only a small amount of memory, around 500KB.

Pros: A straight-forward and memory friendly application.
Cons: There is no visible option to stop it. The only way to terminate it is by killing its process through the Windows task manager. This may be a bit confusing to a computer beginner or an average computer user.


Taskbar Shuffle
Taskbar Shuffle resides in the system area and comes up with a few options, but basically it enables you to move taskbar button in the same way as Taskix: drag and drop.

While the other bells and whistles are:
- start with windows
- group similar buttons either in order started, or only when there are two or more buttons, or group the buttons but never collapse into one button
- allow middle-click to close group or individual taskbar button
- move tray icons by holding down Ctrl or other custom key while dragging and dropping an icon within the system tray

Pros: more options for better taskbar buttons arrangement.
Cons: consumes much more memory than Taskix, that is around 2MB.


Extra tip
You can use Alt + tab keys combination as an alternative. This hotkey is the most efficient way to move back and forth between 2 windows like in the following example case:

I'm opening Text editor, PDF reader, Image viewer, and Firefox. Currently, I need to work only with the Text editor and Firefox but I want to keep the 2 other applications stay running in the background until I need them. Instead of using any of the freeware above, I use Alt + tab.

After some typing, I move to Firefox using Alt + tab. After some reading, I press Alt + tab once and it brings me back to my Text editor directly in one click. Later if I need Firefox again I only press Alt + tab once again. I can move between them using the keyboard shortcut without ever looking at the thumbnails displayed in the Alt + tab dialog.

My suggestion is:
  • use one of the freeware above if you're working with four or more windows evenly
  • and combine it with the use of Alt + tab keys if you're temporarily working back and forth between two windows
Believe me that once you are already get used to these tips you will find that they really help you in processing multiple tasks at the same time.

Windows Software Buzz, At 11:24 AM - Permalink | Post a Comment


View, Read, and Delete Index.dat Files Safely with Index.dat Suite

Need to play around with your index.dat files? Index.dat Suite is a freeware allowing you to view and read the content, and delete all or only selected index.dat files. After scanning the drives you specify, it will list all the index.dat files it finds. It offers an easy way to locate all the files without you have to crawl over your folders.

Is it safe to delete all the files listed?

To ensure that it is safe to delete certain files, this program will automatically mark the files that may not be safe to delete as red.


Here is the list of several things you can do with this index.dat suite program:
  • Create restore point before starting to clean up the selected files.
  • It can also delete temporary internet files, cookies, history, temp files, recent documents, URL history, prefetch folder contents.
  • Ability to view all the files mentioned along with their sizes
  • Backup the index.dat files
  • Auto generate bacth file to help you deleting the files in DOS mode
  • You can optionally do defragmentation after the cleaning finishes
Index.dat Suite works on Windows 98/ME/2000/XP/2003/Vista.

With this software, you can forget the manual inspection of the index.dat files. Or you don't even need to know where they are located if you don't know it yet. It alleviates you to find all in simply one click whether you want to delete them or just try to satisfy your curiosity of what files are currently stored inside the index.dat.

Windows Software Buzz, At 11:17 AM - Permalink | Post a Comment


Find Product Key for Windows XP, 98, 95, ME, NT4, 2000, Server 2003, Vista

A very simple and straight-forward way to find and change Windows product key is offered by Magical Jelly Bean Keyfinder freeware. In fact, this program can do more. The complete list of what it allows you to do is as following:
  • get lost product key for Windows and change it if you need so
  • change Windows registration information without having to crawl registry
  • - find remote Windows key
  • find lost Microsoft Office 97, Office XP, and Office 2003 installation key
This is a stand-alone program so there is no installation required.

Now, you may question its legality as why would anyone change the product key unless what you have is an illegal copy?
As stated on the developer's FAQ page, this is a legal thing to do since Microsot itself provides information of how to change the key together with providing the script specifically made for the replacement process. This program integrates the script into a concise and easy way to executing the process.

Windows Software Buzz, At 11:12 AM - Permalink | Post a Comment


Maximize or Resize Window Automatically with AutoSizer

All this time you always open Windows explorer in maximized view, but suddenly you have it open at a reduced (restore) size. You maximize and close the window. Later on, you open it again thinking that it must be displayed in maximized size, but it still refuses to be maximized which makes you end up clicking the maximize button too often.

This strange behavior doesn't only apply to Windows explorer, but also to other programs. It is as though they completely ignore you.

How to fix it?

There are 2 solutions I'm about to cover here. The first is the common method used by most people without installing any software, and the second one utilizes a tiny freeware.

Use the properties
- Right-click the program shortcut's icon
- Select Properties
- On the Properties window, find the 'Run' dialog, and choose 'Maximized' option from the drop-down list.

Does it work? If not, do the second method described below.

Download and use AutoSizer


AutoSizer is a freeware that resides in your system tray letting you to freely designate the startup setting of every application's window. There are 5 startup options you can choose: minimize, maximize, restore, center, and resize.

At the 'resize' option, the size of the window being configured can be resized into the size you want, and you are able to determine its position on the desktop as well.

AutoSizer supports Windows Vista, XP, 2003, NT, Millenium Edition, and Windows 98.

Windows Software Buzz, At 10:45 AM - Permalink | Post a Comment


How to Close Multiple Windows at A Time

If you open several windows, how do you close all of them? Do you click the close buttons one by one, or right clicking each of the taskbar button and choose 'Close' until the last window?

It is just amazing, sometimes, that Windows actually provides a built-in shortcut to do a task better and faster but we don't know it at the first place, like the shortcut to close multiple windows simultaneously.

It is easy to do it.

Left click each of the application's button on the Windows taskbar while holding down the Ctrl key. After you click all, right click on any of the taskbar buttons. You will see that the common 'Close' option is changed to 'Close Group', click it, and all the running windows will be closed.

Windows Software Buzz, At 10:25 AM - Permalink | Post a Comment


Delete Temp Files with G-Lock Temp Cleaner

Why should you delete temp files? Because it can waste a lot of megabytes of your disk space and cause more file fragmentation which makes Windows runs slow. Temp files that are in use cannot be deleted until the related program which creates them stops running. Unfortunately, many programs still leave these garbage files on your hard drive after they stop running, leaving you accumulated junk files from time to time.

Now, instead of telling you how to clean up this garbage files manually, I'll recommend you to use a software called G-Lock Temp Cleaner. It is free and easy to use, has a sweet look, and accompanied with several options to give you more control in cleaning up temp files.


The sweet things you can get from this freeware are:
  • it has already picked up the common junk files so you don't have to add anything in the type filter area if you don't know what file types should be added
  • you can freely add any additional temp file types to be scanned for
  • ability to scan only temp files older than the current day
  • add your own folder if you have one with files needed to be removed regularly
  • 2 options in erasing the scanned temp files: move to reycle bin so you can restore the files if you have to or don't move them at all
  • ability to scan ZIP files to be deleted as well
  • add profiles for different task of deletion
  • exclude some temp file types from removal
G-lock Temp Cleaner works for any of Windows 32 version (Windows 95/98/Me/NT/2000/XP).

Windows Software Buzz, Friday, December 14, 2007 At 1:22 PM - Permalink | Post a Comment


Get Free Icon Sets with Icon Finder


Need to search for free icon packages?

IconFinder is an online search engine made specifically to ease your job finding cool icon sets on the internet. What is great from this icon search engine, besides its simple and elegant look, is that most icons it delivers to you have great qualities.


What else you can get from using this icon search engine?
  • When you type a keyword for searching specific icon types on the searching bar, a list of alternative related keywords shows up automatically.
  • The size of the icons displayed are 12x12 up to 128x128. You can configure it to search only for certain sizes.
  • All icons are licensed either under Creative Commons, GPL, or LGPL license.
  • When you click an icon, you will be brought to its information page where you can also get same icons with different sizes whenever available.
  • Icon Finder has a Dashboard Search Widget that can be downloaded for Mac OS X user.
The final word is use IconFinder if you want to find only cool icons that free to download. It is another worth bookmarking internet stuff.

Windows Software Buzz, At 1:01 PM - Permalink | Post a Comment


Cool Automatic Data Backup Software for Windows

How do you make a backup file? Data backup is actually as easy as placing a bunch of file duplicates in another location to double its safety from being lost. When you have only a few files, the backup could easily be done in a manual way. But as the number of data you keep increase, it is likely that the manual backup turns out to be a tiresome work to do. You need something advanced technique to do the file backup. This is probably the time for considering to use an automatic data backup.

Now, what is the best data backup among the so many backup programs available and offered by various developers? To be honest, it is hard to give the exact answer since all the programs have their own weaknesses and strengths. Sometimes to decide which one is the best is to think carefully of what you actually need. I think it is somewhat wasting to have a sophisticated file backup sofware with lots of features but only some you often use.

However, though I have pointed out that the sophisticated backup software doesn't mean the best to use, the backup software I'm about to cover here is the one having many features that I found manages to meet my expectations for my daily data backup. It is free, simple to use for beginners but customizable for more advanced users, and packed with various options for expanding its automatic backup's capability further.


Its name is FileHamster, developed by MogWare.

Practically speaking, FileHamster is an automatic file backup that will monitor the specified folders and files in real-time and save every change occurs. Each time a selected file is modified or revised, or remove or add files into any of the folders, this program keeps a backup all the time so you can have several versions of a file.

How it works? After installation, a wizard asks you to create a container called library. In this library you can specify which folders and files to be watched. It enables you to create several libraries with your own name so you can categorize the folders and files included.

The main window itself is divided into two panels. Top panel is the watch tree where all folders and files watched are kept in a tree style, while the bottom is the revision list containing every file backup. You can auto hide the bottom panel to get a wider tree watch screen.

Every file modified is called a revision, and every revision will automatically be backed up. However, the backup or the watch behavior depends on your configuration. In other words, it is fully personalized.

Backup file however you want it...
When you add files and folders to be monitored, there are several options to configure the monitoring behavior. Some of the options are:
  • Letting you to blackout the monitoring on a specific time such as what day and what time the blackout starts, and how long the blackout should last
  • Watch every file type, or create filters to select only certain file types.
  • Keep all the old backup files or set the maximum number if the backup file size becomes too large. Please remember that if you set a limit FileHamster will keep only the specified number of newest revisions while the old ones will be deleted. If you want to keep some specific file backups, exclude them from the automatic deletion by right-clicking on each and select the 'Protect' command.
  • Another way to avoid the backup files consume disk space too much is by setting the maximum size of the revisioned files to be kept. For example, if you set the size to 10MB it will not backup the newest revision with size more than 10MB and every old revision that has a larger size will also be deleted from the revision list except the ones protected.
  • Set expiration time for the backup files whether it is in hours or days. This will automatically delete all the expired files except the protected ones.
  • Restore previous version without deleting the newest one. You can revert back to any of the old revisions that still exist in the revision list without loosing the newer revision you're working on. When a restoration occurs, what happens is the file gets updated and a new revision is created. It is some sort of file exchanging.
  • Ability to add comment to each revision for better reference.
  • By default it shows up a notification bubble containing four buttons with different functions every time a file backup takes place, allowing you to take different actions on the new revision. It enables you to add comment, protect, ignore the file or ignore all the files of the type in the future. You can turn it off if it somehow is disturbing, or customize its behaviour, location, and appearance for a more friendly notification.
  • When you're working on a document and save it often, it may be wise to set FileHamster to backup only every 10 or 15 minutes. Yes, you can do it with this program.
  • Lots of more...
There is also a bunch of plugins to increase the capabilities of FileHamster as a data backup program that can be downloaded for free on the developer's site. The most useful plugin according to me is the zip plugin, which will save every backup file into a zip archive to keep the whole backup size to the least possible.

A plugin to compare revision files to see the differences is ready to download as well. Still, you'll need third party software to be able to diff different revisions.

FileHamster can work with Microsot Word, Excel, Notepad, Adobe Photoshop, Macromedia Flash, Dreamweaver, Autodesk Maya, Adobe Illustrator, Adobe Audition, Adobe Premiere Pro, and lots of others. However, the software's developer states clearly in its helpful manual page that sometimes you may find occasional exceptions.

All in all, FileHamster is a cool data backup solution I recommend to be used to protect your data availability in diffferent versions all the time. The free version has been so powerful for my personal backup necessity. I suggest you to use the free version first before buying the pro version which has several more capabilities. If you think this version is good but you need more features, then get the pro one.

Windows Software Buzz, Tuesday, December 11, 2007 At 1:08 PM - Permalink | Post a Comment


Open File and Folder Faster in Windows XP with FileBox eXtender

Working with thousand files and hundred folders full of data can make somene confuse when it comes the time to manage them for quicker future access. Categorizing files with various kind of information is a pretty consuming time work for me. Often there is no other way than having two same files in two different categories. Sometimes even more.

File categorization is intended to make files easy to be found, but having too many categories in one drive sometimes gives me headache. It is even worse when I have to look for certain files through Open/Save As dialog box.

A possible solution for this is to place particular files and folders separate location that is easy to see. Then we can open file and folder faster without having to browse a long way and click several times. But how? In Open/Save As dialog, we can replace the default folder in the sidebar with our own folders, but not files. While in another application such as Windows explorer we can add files and folders in the Favorites menu, but they won't work in another application.

What if the files and folders are placed into one container and put it at the Windows title bar?

You don't have to modify registry for this. Just use FileBox eXtender, a free program offering you the access speed to your files and folders.

FileBox eXtender works by adding several buttons on the right side of the Windows title bar. By default they are shown up next to the minimize, maximize, restore, and close buttons, but you can move their positions altogether from FileBox eXtender's configuration window.

The main button is the one with a little heart on it. This button enables you to add file and folder shortcuts within. You can organize file and folder into a folder or subfolder to avoid it gets too crowded if you have plenty things to add.

The file and folder shortcuts can also be renamed so each can be identified easily and it's also helpful if you have a file that originally has a long name because you can make it shorter.

Every file and folder you add within the button can be accessed from anywhere no matter what application you use. This is because FileBox eXtender doesn't only attach the "heart" button to Windows title bar, but also put it in the system tray. However, you can hide it if you want to.

What even better is that you can associate personalized shortcuts to access both the favorites and recent folder menu. So you don't have to move your mouse to system tray or title bar all the time. Just make sure the shortucts you use aren't used by any other application to be able to use.

Other buttons allow you to open folders you recently accessed, make window stays on top, and roll up window.

Sometimes you may want to open a file or launch an application but you want it to stay in the background first for you are still working on something. Still, it always steal focus so that you have to minimize it all the time to go back to what you're working on. This "push-pin" button, which makes a window stays on top, allow you to prevent that stealing. It doesn't prevent focus stealing, but at least it won't let another window steal the present window you're working with.

FileBox eXtender is a freeware and works on Windows XP and previous versions (only Windows XP that is informed clearly).

Windows Software Buzz, At 12:37 PM - Permalink | Post a Comment


Photo to Sketch Software: FotoSketcher

FotoSketcher is a free software specifically designed to sketch your colorful photo into a black and white painting in seconds. Or you can just make photo to looks like has been hand drawn but still colorful.


Not much features you can find in this program. In fact, it only enables you to sketch photo with three configurations:


edge threshold: move slider from left to right for more defined edges
edge intensity: move slider from left to right for lighter to darker edges
colour intensity: move slider from left to right for a more colorful result
But because it is so simple, you can easily do the sketching job as easy as moving the slidebars to get the result you want.

The current version allows you to save the result only in jpeg format.

FotoSketcher works on Windows.

Windows Software Buzz, Sunday, December 9, 2007 At 11:14 AM - Permalink | Post a Comment


Cannot Delete File and Folder in Windows XP?

There are times when suddenly for without obvious reason you cannot delete a file. You try several times but Windows keeps displaying the annoying message informing you one of these problems:

- cannot delete file: Access is denied
- the source or destination file may be in use
- cannot read from source file or disk
- make sure the disk is not full or write-protected and that the file is not currently in use

But what is using the file? What is causing error actually? No additional information, no further explanation.

Sometimes just by killing the explorer process through the task manager and restarting it again the locked file problem is solved, but sometimes you have to restart Windows when it doesn't work. The question is do you want to restart Windows everytime you're unable to delete a file? I don't. What irritates the most is when a file cannot be deleted even after system reboot.

This happened quite often to me until I finally found this Unlocker. Since I use this free program, I have never had any difficulty anymore in deleting a locked file. All the locked files can be deleted just by right-clicking on it and select the command to unlock it. No need to restart Windows at all.


It lets you know which program is currently locking the file as well. Then you can decide whether you want it deleted, renamed, moved, or copied. At the Unlocker sites, the author, Cedrick Collomb, shows you the comparison of the unlocking feature of Unlocker with several other similar programs to ensure you how cool it is. And it is.

If you want it to automatically display the unlocking dialog when a file cannot be deleted, let the Unlocker assistant runs in background. The dialog shows up right after you close the error message displayed by Windows without you have to right-click the locked file.

This program can also be used to delete index.dat file. Just right-click the file, select "Delete" option (see screenshot), and end it by clicking "Unlock All". Warning: In some cases you may still need to reboot Windows to delete a locked file, but mostly you don't need it to. Moreover, sometimes you may find that some files cannot be deleted even after running Unlocker's normal operation. Go to the Unlocker's site to get the answer as I notice there are some common problems that are answered there. For me, this program does its job very well.

Unlocker is a freeware and works for Windows 2000 / XP / 2003 / Vista.

Windows Software Buzz, At 10:58 AM - Permalink | Post a Comment


Backup Firefox Extensions, Themes, Bookmarks, Preferences...or Everything!

FEBE: a firefox extension allowing you to backup and restore not only all the installed firefox extensions and themes, but also all the configuration you've applied to.


How FEBE works?
The commands of backup and restore can be found on the Tools menu of Firefox. Select 'Tools' > 'FEBE' > click the task you want to execute.

What you can do with FEBE?
You can select the items you want to backup under the 'Selective' backup option within its configuration window. If you choose this backup method, you will be able to restore what have been backed up individually. You can restore only the bookmarks or the preferences, for example.

Or you can perform backup of the entire profile at once under the 'Full Profile' backup option. The downside of this method is that you won't be able to restore individual item.

In my opinion...
This is a handy solution to keep Firefox looks and behave just like what we want to. The possibility to maintain the backup files in different folders each time we do backup makes it easy to pick up what you want to restore. For instance, to restore preferences backup in folder A and bookmarks in folder B.

Windows Software Buzz, Friday, December 7, 2007 At 1:42 PM - Permalink | Post a Comment


Send Online Invitation with Lots of Features with Amiando

Amiando: a free service letting you to publicize and invite people to your private or professional event by a free and customizable website with your own web address and by sending personalized email.

"Send free online invitations with amiando or open a ticket shop and start your own online presale"

The website, or let's say your online invitation page, can be designed easily as it provides about 40 free templates to choose from. You can create your own design if you want to. The address of your invitation page will be "www.amiando.com/youreventname'. It enables you to add photos, guest list, message board, and carpools to the page. Moreover, there is a preview function to check how your invitation page looks like before its official launching.

While the online invitation page has the option to be registered with search engines, online invitation can also be send out via personalized email.

For bloggers, you can promote your invitation page at your blog by adding buttons and widgets.

Amiando allows you to track who accept/decline your invitation via what is called participant list. This list will show you all the replies of those invited.

There are still more nice options for you to check out at Amiando site like the possibility to create an online ticket shop.

Windows Software Buzz, Wednesday, December 5, 2007 At 2:50 PM - Permalink | Post a Comment


Make Windows Faster with Advanced WindowsCare Personal

Just a few clicks to repair Windows errors, recover disk space by cleaning up junk files, protect computer from spyware and adware threats, keep your privacy from being stolen by erasing activity history and surfing traces, controlling and optimizing Windows startup items, and optimizing system performance. These whole things in one package with so simple operation make Advanced WindowsCare excellent tool for anyone especially they who aren't computer geeks.

In case something unexpected happens, it provides you backup facility with which you can create restore points. It allows you to decide how many backup files should be kept as well. If it isn't enough yet, there are still additional tools like uninstaller, cookie manager, startup manager, and more.

This program works just like what it promises. Very easy to use, speed up Windows, and repair the crashes that slow down your system. It makes Windows faster without any headache.

OS supported: Windows XP / Vista / 2000
License: Freeware
Version reviewed: 2
Additional note: pro version is available

Publisher: IObit
Download page: Advanced Windows Care

Windows Software Buzz, Monday, December 3, 2007 At 2:01 PM - Permalink | Post a Comment


Enable Unsigned Themes on Windows XP by Patching up UXTheme.dll

Do you want to change the standard theme of Windows into something cool like the pictures below?


Unsigned theme refers to theme that isn't originally created by Microsoft, a large collection of which can be found on site like Deviantart. Unfortunately, it is useless to download any of the themes availabe since they won't be able to be used without patching up the Windows uxtheme.dll.

How to patch... it's easy!

There are at least two ways to do the patching which both utilize small-size programs: Replacer and UXTheme-MultiPatcher. They work successfully for me. But here I'm only going to cover how to use UXTheme-MultiPatcher since it involves just a few clicks and simpler operation than the Replacer.

First, you need to download the application here. It can be used for Windows XP (includes SP1 and SP2) and Windows Server 2003 (includes SP1 and SP2). Note that I tried it on Windows XP. I have no idea whether it works well or not for Windows Server 2003.

1. When you run it, there will be a notification that it will patch your uxtheme.dll so third-party themes or other form of visual styles can be used. It is informed as well that the patched system can be unpatched by running this program again. Press the patch button when you are ready.


2. It will try to detect your OS and ask for a confirmation afterward. Press Ok if the OS detected is correct.


3. You will be instructed to wait to cancel Windows File Protection that is about to show up.


4. After cancelling, the Windows File Protection will warn you that the modified files may cause system instability if you keep them. Ignore it by pressing the Yes button. Next, you need to restart your Windows.


That's it. Now you can use unsigned themes on your Windows XP to make it looks much cooler than before.

Windows Software Buzz, Saturday, December 1, 2007 At 2:21 PM - Permalink | Post a Comment


Featured Windows Software

Recent Software